Wednesday, October 26, 2011

[Quest Guide] Shadow of Glory

Hello there,

Fossiker's Plains Map
Today I went back to Forsaken World. I had a friend of mine drop by my house and he asked me about the game. It seems I might get a healer to play with me once again! Anyway, I got myself back in the game and decided to do some Life in the Harbor dailies to finally reach level 50. One of these quests was 'Shadow of Glory' which was new to me and it had no auto-walk links for me to click. The only thing in the description was something about the owner of a Villa which had a painting that Henry wanted for his collection.

Cutting to the chase, here is what you need to do.

First, go to Chiffon Villa. If you are in Freedom Harbor just catch the teleporter to Fossicker's Plain.

Looking at Shadow of Glory
There you will find a ruined Villa. Enter it and there's a couple of paintings you can click on. Both give you Collection: Footpring Cards which you can instantly add since you can click the paintings again and get another copy. The Shadow of Glory collection card, however, not only allows you to finish the Life in the Harbor quest it also gives a quest of its own which takes you to Niachilo (the scholar dude in Freedom Harbor).

Once you get back to the Freedom Harbor just deliver the quest to Henry for your daily grinding and back to Niachilo which doesn't give you a follow up although he does mention there's more to learn about it.

Wednesday, October 5, 2011

A status update

Hello everyone,

If anyone is following my blog you probably have noticed I haven't posted anything in awhile. There's two reasons for that. I've started a new job 1 month and 2 weeks ago which has been sucking all my energy, but in a good way. And I've also acquired Dawn of War II which has been occupying what little free time I have left. I plan on getting back to Forsaken World soon and check what new stuff is there. Until then.

Sunday, August 14, 2011

[Pets] Journeys Guide

Recently we saw introduced into the game the ability to send our pet on Journeys. Once this was implemented in the game I decided to try it out and see what was available, how it worked and what could I get out of it.

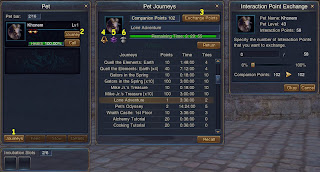
So here is how it works. When you open your Pet Panel, if your pet is recalled, you can click on a new button located on the pet frame of each of your pets (in the picture, this is marked with a number 2). You can only send out one of your pets into journeys. This means there's no profit in being a Tamer.

Once you send one of your pets in a journey he disappears from the Pet Panel and shows up on the Pet Journeys panel. The Pet Journeys panel can also be opened with the Journeys button on the Pet panel (the number 1 in the picture).

All you have to do on the Pet Journeys panel is to select one of the available Journeys and click the OK button which is next to the Recall one. It isn't showing because I already have my pet on a Journey, as you can see from the green bar with the countdown timer at the top.

Once the Journey ends you will have another button show in the Pet Journeys which says "Rewards". Click it and you will get the rewards your pet collected during its journey.

To have your pet available to you once again (i.e. be on the Pet panel) you need to press the Recall button on the Pet Journeys panel.

That's it for basic interface.

Journey Requirements
All Journeys require companion points, at least one daily try available and a certain amount of time. Some journeys also require special items.

Companion points are specific to Journeys, this means you can only spend them by sending your pet on journeys. They have no other value, as far as I know. The amount of points each journey requires is listed on a column in the Journeys list. So use these wisely. You can get more companion points by:
  • Trading Interaction points for Companion points. This is done using the exchange interface in the Pet Journeys panel. So keep that in mind when spending your companion points.
  • Spiritual Whistle or Hick's Whistle. I haven't yet acquired one so I don't know exactly how to obtain these. I'll update this post once I find out more about it.
Each Journey has a certain real time duration. This value also shows up in a column in the Journeys list.
  • Daily tries. This means you can only do this Journey this amount of times today. This value can be affected by your own daily tries on certain quests, such as Cooking Tutorial, God's Trial, etc. This is the last column in the Journeys list.
  • Pet scrolls. These are a new variety of items and are required by some Journeys. There's the following scrolls available: Pet's Trial Scroll, Pet's Elemental Scroll, Pet's Fissure Scroll.
  • Other requirements such as Explorer's Guild scrolls or Lionheart Scrolls.

Generating Interaction Points

This is a tricky one. First of all, interaction points are a per pet stat. You can check the amount of interaction points your pet has by checking the mood (marked in yellow on the picture to the right). You gain 1 interaction point every 5 minutes while your pet is summoned and only that pet gains those interaction points. This is pretty much a very good reason why you should have your pet summoned at all times.

How to do Journeys

I haven't tried them all but I've tried a few already. I will update this post as soon as I have more info on other Journeys.

First of all you should select your pet with the highest level, the best quality (between normal, green or blue) and the most Talent levels. This is because the time required for each Journey is reduced by a certain percentage based on these 3 things. You can check how much each thing affects the time of each Journey by hovering over each of the icons I signaled with the numbers 4, 5 and 6 on the picture above.

At least once a day you should do the Lone Adventure or Pet's Odyssey. I've tried the Pet's Odyssey and, just like it says on the tooltip info when you hover over it, it just gives a chance to get an Advanced Pet Essence when comparing with the rewards from the Lone Adventure. But, from my personal experience, Pet's Odyssey has a better chance to give good rewards. Here's my results:
  • 4x Lone Adventure netted 6 Newborn Energy Potions, 1x Pet Elemental Scroll
  • 4x Pet's Odyssey netted: 2x Pet Elemental Scroll, 2x Pet Fissure Scroll
As soon as you have a Pet Trial Scroll, a Lionheart Scrolls and 100 Companion Points don't even think about it. Immediately send your pet on a God's Trial Journey. The amount of experience is far greater than doing the run yourself, even with the Lionheart Scrolls and all.

What Journeys should I do on a daily basis

So, to sum it up, try to do the following Journeys on a daily basis:
  1. Pet Odyssey or a few runs of Lone Adventure to get a chance of earning Pet Scrolls
  2. God's Trial Journey. If you have the Pet Trial scroll, Lionheart scroll and 100 companion points (exchange interaction points if you need to) then do the God's Trial Journey. Plenty of experience.
  3. Run Girl Run. Do this if you require Recharging Star Shards. It's 25 companion points, so you can't do this everyday unless you get a hand on some points on top of exchanging for interaction points.


Sunday, August 7, 2011

[Profession Guide] Scavenger and Armorsmith

I finally reached level 40 and was anxious to try out two new professions. This meant that I had to freeze one I already had and pick up Scavenger and Armorsmith. I chose those two because Scavenger is necessary for Armorsmithing.

I'll cut right to the conclusion by saying that Armorsmith, unless something still eludes me, is definitely not something to have unless you have lots of Gold Coins to spend. Scavenger on the other hand is very handy for money making. And with the money you make from scavenging quest rewards or cheap items from the auction house you can make enough Gold Coins to buy the items you need.


Freezing a Job

Just like it says, freezing a job means the job will be frozen and you get a Job Point to spend wherever you want. A frozen job means you cannot gain more Job Experience but you also don't lose any progress/recipes you had for that Job. To freeze a Job you need Wisdom Fruits. As fair as I know there's only two ways to obtain these:
  • Eyrda Boutique (costs 120 eyrda leaves to buy one)
  • Certain quests and on some Achievement Trophies.
Once you have your Wisdom Fruit just open your Job interface and click the Freeze button on the bottom-right of the Job panel. After that just select the Job you wish to freeze. I chose fishing simply because it's boring and consumes too much energy too easily. Besides, there is no real profit in fishing. More so if you compare it with Botany. The only real alternative would be to freeze Mining, but since I will be needing mining once I start Jewelcrafting at level 45, that wasn't an option.


Scavenger

This is a very useful profession. You can turn green quality items (as long as they have a level requirement above 40) and blue quality items (above level 30) into useful stuff for Armorsmithing and Weaponsmithing.

Green quality items level 40-49 are turned into a random set of 2 splinters. There are 4 types of splinters:
  • Illyfue Splinter
  • Mylvada Splinter
  • Vyda Splinter
  • Tytan Splinter
Level 30-39 Blue quality items are turned into a random set of 2 splinters and 2 prisms. The Prisms have also the same name as the splinters:
  • Illyfue Prism
  • Mylvada Prism
  • Vyda Prism
  • Tytan Prism
I usually just sell at the Auction House whatever I got. I have a series of rules to set my prices. First, I always check the market to see how much I can get from an item. Then I have certain minimum prices for items. So if the market is too low I don't put them for sale. If the market is REALLY low I even buy the items and stock up. I usually put the splinters for sale between 10-20 silver each and the Prisms between 30-50 silver. This gives me a 20 silver income on greens and around 80 silver on blues. So as you can see, if I can buy blues under 60 silver and greens under 10 silver, I do it. The rest is just profit.


Armorsmithing

I will be very brief since I chose not to continue this profession. First, you have to spent 70 silver for each recipe. Each recipe (at level 1) has the following requirements:
  • 3-6 splinters of a certain type
  • 3-6 splinters of another type
  • 6 Red Quicksilver Ore
  • 10 Vigor (YES! 10!)
The recipes are not for Blue Quality items, it's for Green Items. And as far as I understand it, you have a chance at creating a Blue quality item each type you create a new item. This would put the cost, in terms of Gold Coins, for each item in the range of 66 silver up to 1 gold and 20 silver. Sure, you might do awesome stuff but I'm not sure how this profession could turn into an actual profit.

Friday, July 29, 2011

[Quest Guide] Knowledge Quiz

There is a daily which you can do 3 times a day once you reach level 3 Socialite. You can get it at Rio and it involves going to the Library, talk to Niachilo and answer one of this questions about some lore. This obviously requires a cheat sheet or some sort of nerd wish to know by heart tons of Lore about Forsaken World. If you are that kind of person, read no further. If you are like me, lazy and just want to finish dailies fast, then read on.

Once you reach Niachilo and chose to start the Quiz he will ask you the answer to a certain Story (which is numbered from 1 to 10) about a certain Theme (which is named just like one of the sections bellow). So just use the text bellow (taken from the http://www.eyrdaian.com) to check the right answer.

Abyss

  1. Revenge: To avenge his sister
  2. Into the Darkness: Shadow Dragon
  3. Portal: He got caught up in a Doomsday Cult
  4. Ghoul: Human Mage
  5. In the Darkness: A song for the lost and damned
  6. Wordplay: He is a braggart
  7. Good and Evil: View Evil
  8. Ocean: A Pirate Ship
  9. Birth: Duke of Debate
  10. Ferryman: The Third Boatman

Anecdote

  1. Frog: A frog
  2. Wrist Blade: A bandit
  3. Mob: Growth, Time, and Death
  4. Deception: a thief
  5. Foul Books: You may use magic at your will, for a price
  6. A Day: Farmer
  7. Mirror: The people who is the most beautiful woman in the world.
  8. Path of Glory: Knight
  9. Deal: Wealth and Power
  10. Dream: Day dream can not come true

Dark Sea

  1. Seasons: Worrying Is Bad For You Health
  2. Oath: No, he doesn’t.
  3. Hitman: His Lover
  4. Butterfly: Retribution
  5. Tombstone: Paradise Singer
  6. Weeping: In dark, humid swamps
  7. Charisma: She’s motivated by love
  8. Bird: berghaans and Phoenix
  9. Tangle: Things that cause us pain may also help us
  10. Half Wit: You can’t make everyone happy all the time

Inferno

  1. Seek: A sword
  2. Love: Old man and his former lover
  3. Discussion: Love can not be found,because it depends on luck
  4. Time: The past can guide the future
  5. People: We will destroy ourselves
  6. Soul Lost: A concubine
  7. The Past: Mummy
  8. Fish: He was killed by the city guards at the gate
  9. Weapon: Expectations are not always reality
  10. Blank Paper: To be left blank and untouched

Night Tale

  1. Black Cat: A supernatural entity
  2. Flesh: Human Meat
  3. Keep Secret: Dead men tell no tales
  4. Assassination: Arrogant people will be defeated by carelessness
  5. Devil: Wint
  6. Breed: Immortality
  7. Bloody Wealth: A Naga
  8. Happiness: He falls victim to chemical induced-ignorance
  9. Emir: Disrupting tradition will result in revolution
  10. Death: I enjoy what I’ve become… I can’t wait to share this gift.

Song of Daylight

  1. Beginning: A love letter
  2. Teeth: The main character
  3. Cherish: Nicolas
  4. Rabbit: A Large Wolf
  5. Day and Night: Storm Legion
  6. Mortal: Hind sight is always 20/20
  7. Glory: To Protect the Nobility
  8. A Letter: Pan
  9. Revival: Marquis of Voidcairn
  10. Blindness: Yes he does

Wanderer

  1. Thief: Light Protecting Clothes and easy hiding weapon
  2. Risk: Mole, Jackal
  3. Quest: No
  4. Prophet: Skylark , he is aware
  5. Mummy: Killed while protecting the village
  6. Treasure: To become immortal
  7. Flea: Aschir
  8. Remember Her: Killed Anna and gave the corpse to John
  9. Sin: They joined to avoid being killed
  10. Adventure Log: No He Didn’t

Whisper

  1. Mask: The blood of their companions
  2. Quotes: Earthly treasures are easier to come by than those of the heart
  3. Last One: The Bard
  4. Key Weapon: Human Mind
  5. Treasure Map: You can’t rely on a treasure map
  6. Prisoner: YES
  7. Last Opportunity: One that allows the wearer to transforms into a roach
  8. Belief: A stone statue
  9. History: Yes
  10. Unable: Get humans to stop fighting each other

Tuesday, July 19, 2011

[Quest Guide]: A Puppet Returned

This was my first special quest and I hit a snag when I found it. These quests require you to read the NPC texts carefully. Know the world and where some NPC are located. So here is a guide for this one. I found it on the Forsaken World Forum

Part 1

  1. go to a Grocer npc in freedom harbour (open map M and scroll down for Grocer npc and double click to auto route ; very easy to find Toodle the little clown on the way to the Charlie's ship)
  2. buy scissors ( Misc. the 2nd tab from goods category) - 20 soul-bronze-coins
  3. give it to Susan [Freedom Harbor 57 52, 0 -6] on the alley behind the alchemy tutor.

After that , wait around 1 min. or come back later to take the puppet
Repeat for another puppet if you see message on quests 2/3 about turning in puppets.
After you done 2nd time puppet go back to Annie from Oblivion area.
Note , not all puppets are required , Anne will need the male puppet i think, other puppets left u can store in bank if need later or delete them, I saved them in bank just in case. Later if i dont find a use of them i will delete them .

Part 2

Crab's Bauble 0/1 - After you turned in the puppet quest , for 2nd part , teleport back to Freedom Harbor , look on world map in Kalaires Plain for Lake of Clemency . Go there and kill Freshwater Crabs (lvl14-15) , the Bauble drop is random. Can be droped from 1st crab or after more than 15 crabs

Part 3

Cod Fishing ( Cod fish 0/3 ) - Bring to Anne 3 Cod.Cod fish can be bought from AH or free from Fishing job (lvl2) near Fishing tutor on that lake or from players afk shops.If you have an alt char with Fishing job i suggest you to start fish 3 cod and send them to your char when you start A Puppet Return
(mail takes 1 hour to receive it and 5 soul silver)

Part 4

A Single Lavender ( Lavander 0/1 ) - Bring to Anne 1 Lavender . Lavender ( lvl 1 botany herb) can be farmed in Kalaires Plain map , bought from AH or players shops.

Reward :
~2 gold (untradable coins)
~12k Exp
-Leff's Letter (dont know a use of this yet)

Monday, July 18, 2011

[Profession Guide] Socialite

Raising socialite skill isn't easy. I also had a hard time understanding how to get the Persuade and Intimidade skills which you should notice begin to be sort of a requirement to some quests once you reach level 20.

Raising Social Skill

In order to even learn the Persuade and Intimidate Job skills (don't confuse these with the ones you can use in NPC dialogs) you need to be a Level 3 Socialite, which is no easy task. The best way to raise social skill, which means earning social experience, is by doing the following Rio daily quests:
  • Scent of the Heart (requires level 1, gives 10 Social skill)- I haven't yet done this one. It requires a female and a male character. The female obtains a certain perfume. The male then needs to obtain the same perfume and give it to the female. Then she uses the perfume near the male character. Or something like that. As an extra benefit you learn special actions/emotions once you do this quest. One of them (kiss) is required for some quests. So I suggest doing these in a bunch
  • Wish Card (requires level 1, gives 10 social skill) - You can do these only as part of the Life in the Harbor dailies you get from Henry. Sometimes you can get lucky and get 2 or 3 in a row, but don't rely on these to do steady level up of your social skill.
  • Negotiations (requires level 2, gives 90 social skill) - You can do these by simply talking with some NPCs. It will be a major help reaching level 3.
Personally I only did Negotiations and Wish Card quests. I tried the scent of her heart but most of the times I found impatient female characters who didn't bother explaining me what to do and since I was still waiting for some real life friends to join me on Forsaken World I decided not to bother too much with it.

Persuade and Intimidade Skills


You get these skills from the Socialite Tutor.Pierre Dannika for example, which is right next to Rio. There is a catch though, which I only found out after reaching Socialite Rank 3: you need to have thirty social contribution to learn each one. That's right... social contribution. I thought I had to volunteer at the hobo Christmas dinner or something but no. There is only two ways to obtain social contribution and that's:
  • Enter instances with a party. It doesn't need to be a pre-formed party. You need to finish the instance however. And I'm not entirely sure how the social contribution points are awarded. Probably having people finish quests and stuff adds a bit more. If you do God's Trial frequently you won't have a problem with lacking social contribution.
  • Finish Quell the Elements quests with a party. Once again, I'm not sure it needs to be a party of more than 2. I still need to try this out. This quest is given in Sea of Oblivion and requires you to kill a bunch of elemental monsters (usually 20).
You can check your social contribution points by opening you character pane, then opening the Reputation pane, clicking the Personal tab and checking the Contribution value. Hovering the mouse over the Contribution gives you some help on how to get more of it and how to use it.